If you’ve done your prerequisite work (meaning that you watched some Max videos), you should understand the following:
- You know that Max-built programs are called patches (or patchers).
- You know that Max-built programs are made from objects.
- You know how to lock or unlock the patcher.
- You know how to select objects from the object toolbar.
If that’s not the case, you may want to watch more videos, or you may want to ask someone for help.
The button object
We are going to start our 20 Objects Tour with the simplest — yet one of the most often-used — objects in the palette: the button. The button is a user-interface object, which means that it interacts with us when we lock the patch, and that it can produce some sort of message as a result of our actions.
Let’s start by creating our first patch. It should look something like this:

Patcher
<pre><code>
----------begin_max5_patcher----------
299.3ocmQssZCCCC8Y6uhfeNajKcgx9UFihShnykD4fiRWFk9uOa4jltMFL1
Kxnikz4nitHEpZ6LLpRdN4kDg3hTHXn.fXIWn50yMc5QtLEBuaqOoRieQvLw
vCNCRqn3TuA6.h6HeAbPSMuYviGbPCEYLOO6wrzj7J9orHDK7wjW2FjchVmT
1BpokozKiGJUAnqRYHj9GWg5Ihr3+Tr6ehU4t03un00AEgnOFf3TT0Z7n5VS
2sJEpab6z8.AtC.pq63FytaM4lUcF76GNVzA7ut6i1IWyJ8KLkro6VXjLnlL
dKYqlxXM+fV8vvYvMtTLSg2bOYcgz8obpAioUbpCNaVqufQzNu2RdicxwxRM
WsSEa01BNbxvNnLbR8TxGNzaIiC53dv2W4U4mP05mdC
-----------end_max5_patcher-----------
</code></pre>
We create this patch by following these steps:
-
Run the Max application.
-
Select “New Patcher” from the File menu. This will create a new window that says “Double-click to make a new object” in the middle of it. This is a blank patcher window, and will be where we build our patch.
-
You will notice that the window has a toolbar above it with a number of images of object. Click on the button-like icon to drop down the selection palette, then select the first item — a
button:

Click on it (but not on any number that appears on top of the button); a button will be placed at the target point within your patcher window.
-
Lock the window (by clicking on the lock icon at the bottom of the window), and click on the new button. You will see that it lights up every time you click on it, responding to your action. Unlock the patch (by again clicking on the lock icon at the bottom of the window) and click on the button. It will now be selected, and you can move it or delete it like you would using any graphics program.
-
Let’s add another object. This time, select the object at the top-left. This is the standard object box; selecting it will place it in your patcher window and place the cursor inside, waiting for you to identify which object you really want to create. Type “print”, then click outside the object. The object will transform into a print object, and will add an inlet at the top.
-
Click on the outlet of the button object (the little black nub), and drag toward the print object. You will see a line forming as you drag. Drag it to the inlet of the print object and release the mouse — the line will now connect the two objects. This line is called a “patchcord”, and is the way that one object communicates with another.
-
Lock the patcher, and make sure the Max window is showing — if it isn’t, you can make it appear by selecting Max Window from the Window menu. Now click on your button. You should see this appear in the Max Window:

Congratulations! You’ve just created your first Max patch from scratch. It may not seem that impressive, but in Computer Science terms, you’ve done quite a bit: you created an application, gave it a user interface, responded to mouse input and generated text output.
Let’s modify the program by adding a second button. Unlock the patcher window, then use some of the steps we just did to add a second button. Connect the new button to the print object so that you make something like this:

Lock the patcher and click on either of the buttons — they each will produce the “bang” message in the Max Window.
Let’s modify the patch even further. Add a new button above the previous two buttons, and connect this new button’s outlet to the inlet of both old buttons. The patch should look something like this:

When you click on this new, top-most button, you will see that the connected buttons also fire, and that the Max Window shows two new bang messages. What’s going on here?
The button object’s output is the message “bang”. In the world of Max, the “bang” message has a very important purpose: it tells the receiving object to do whatever it was designed to do. This bears repeating:
The “bang” message tells the receiving object to do whatever it was designed to do.
The button object was designed to do two things: to light up whenever it was activated, and to send a bang message out of its outlet. Therefore, when a button receives a bang message, it acts just as if we had mouse-clicked it — it lights up, and it sends out a bang message.
Save your patch by selecting Save from the File Menu. You can place the saved patch anywhere you want, but most Max programmers will create a specific Max folder for all their patches. You might as well do the same — you are well on your way to Max stardom already!
Exercises
It’s time for some patching exercises. Please make the following patches:
-
Create a new patch that is similar to one above, but have a single button create eight bang messages to the Max Window. Once you can do that, use the Copy and Paste commands from the Edit Menu to modify the patch to output 16 bang messages.
-
Create a new patch that looks like this:

Pay close attention to which buttons are connected to which other buttons. Lock the patch and click on any button in the patch. Make sure you understand why you see the results that you will see.
Friend Object: print
I’d like to introduce the concept of “friend objects”. This isn’t traditional Max programming jargon, but it is appropriate for the way we are learning Max. A friend object is one that is useful when working with another object. We’ve already seen one of button’s useful friend objects — the print object. Let’s dig into that a bit more.
The print object is incredibly useful, since it gives us the ability to see the output message generated by almost any object. When you begin building more complex Max patches, you will probably use the print object constantly, scattering it around your patch to report the output of important parts of your program. However, once you start outputting a lot of print messages, it will be difficult to know which print object is causing which message. In order to solve this problem, the print object allows you to tag the Max Window message with a name.
The way that you tell the print object to use this name is by adding an argument. The argument for an object is used to set up some data within an object that will be used in future processing. The way you add an argument to an object is by appending it to the object name, separated with a space. So, if I wanted to name my print object “puppy”, I would add this as an argument to the print object. It would look like this:

Now, if I create a simple button-to-print patch with this puppy-print object, the output to the Max Window will change. Clicking on this:

will give us this:

Now, create a new patch that looks like this:

Lock the patch, click on the button and see if it matches your expectation. Click it again to make sure. Did you expect 2 to print before 1? Most people wouldn’t, but this reveals one of the important ways that Max works. Two things can’t happen at the same time, so some decision has to be made about which will happen first. In this case, Max saw that print 2 was to the right of print 1, and Max gives priority to the rightmost object. This is important to remember: when two things are supposed to happen at the same time, the one to the right will happen first.
Let’s try another experiment. Create a new patch that looks like this:

In order to make sure that the print objects are vertically aligned, select the two print objects and select Align from the Arrange menu. Now both objects have the same right-to-left orientation; which one do you think will fire first? Try it and see.
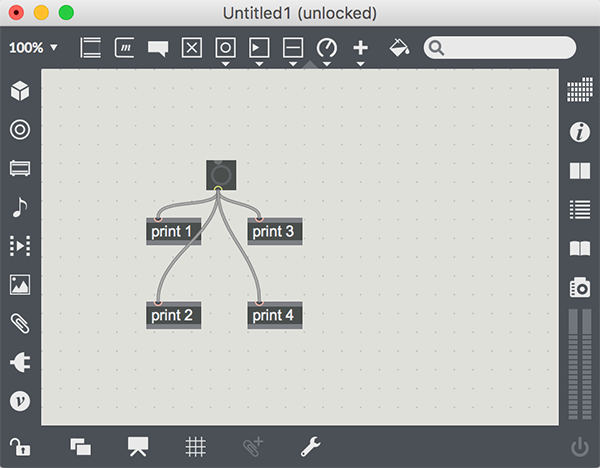
The print 2 object fires first again, telling us that, given the same horizontal location, Max will give priority to the lower of the two objects. Let’s try one more experiment. Make a patch that looks like this:

Make sure that the print objects are all vertically aligned, then lock the patch and click the button. The print objects fire in reverse numeric order, telling us that Max is moving from bottom to top, then left to right. To express this as a rule-of-thumb, we would say: When one object sends a message to several other objects, it does so in right-to-left order, with bottom-to-top priority when objects are vertically aligned.
This is called the execution order of the objects, and is important to remember. Not paying attention to execution order can cause some mysterious bugs in your patches, so we will introduce it early and refer to it often!
Exercises
Here are two exercises to try:
-
Using one button and four print objects, make a patch that shows four bang messages in numerical order.
-
Modify the patch from the previous exercise, but make it fire bang messages that produce the following order: 2 4 6 8.
Related Object: trigger
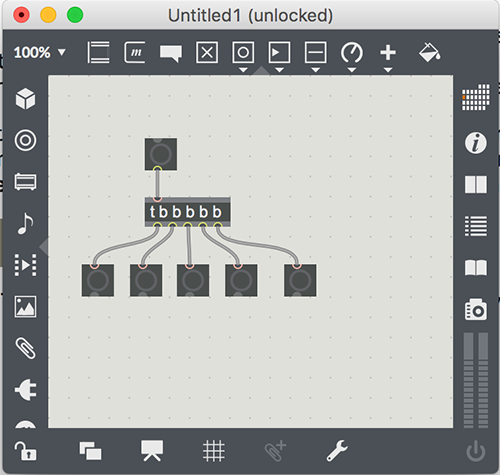
Sometimes, we need to control the order of message creation. An important object that we can use is the trigger object — almost always abbreviated “t”. The trigger object accepts input through its one inlet, then sends output through as many inlets as it has arguments. We are going to work with the trigger object a lot in the future, and we will see that it has many different function. However, for now, we are going to use “b” arguments: these tell the trigger object to output a bang out of its outlets. To get a trigger object that will produce five bangs, we create it with five “b” arguments:

If you click on the top-most button, you will see that the input is send out to all five outlets and their respective buttons. Why would you do this? If allows you to be more explicit about your order of execution. The right-most trigger outlet will always fire first, and the output will continue from right-to-left for all five outlets. This way, you can move around the receiving objects (the buttons in this case) and still make sure they are firing in the order you expect them to.
To test this out, add five new print objects to the patch (naming each one, so we can see the firing order) and connect them to the buttons. You should be able to move the print and button objects, change their left-right and top-bottom order, and see that you always get the results you initially intended. In general, it is wise to use a trigger (“t”) object any time you are attaching one object to multiple other objects and need the firing order to remain consistent.
Friend Object: delay
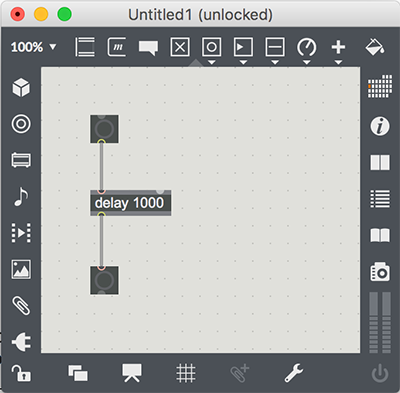
Another friend object for button is the delay object. The name of the object tells us what it will do: it will receive a bang message and delay it for a period of time. Create a new patch that looks like this:

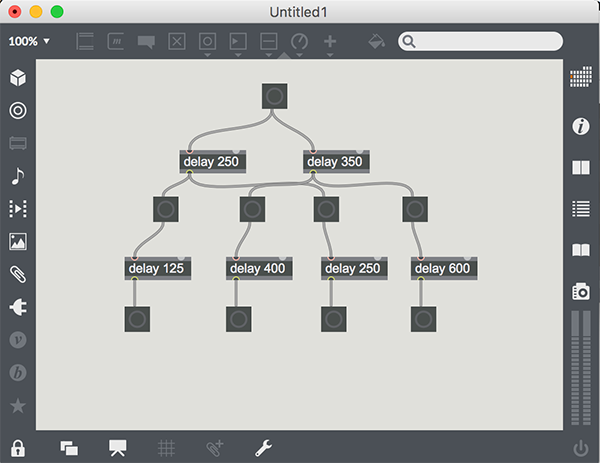
Click on the top button and watch. One second later, the bottom button lights up. The delay object in between the two buttons has delayed the bang message for one second. The “1000” argument for the delay object tells the object to hold the message for 1000 milliseconds (one second) before sending it on. As you can imagine, this is a useful message for changing the order that objects receive messages. Let’s make a more complicated delay-based patch:

This gives us a holiday tree-like spectacle, blinking the lights from top to bottom in an order determined by the delay objects. Let’s use the delay object in some exercises.
Exercises
-
Use
delayobjects to create an oval racetrack of blinkingbuttonobjects. Note: This is a good time to think about routing the output of one delay object into another delay object. Since the output of delay is “bang”, and the expected input is “bang”, they can connect directly without a problem. The other thing to watch out for is endless loops — if all objects are connected together, there isn’t any way to shut them down! -
In order to get used to using milliseconds for timing (and believe me, it is used pervasively throughout Max), create a new patch with five button-delay-button combinations, but have them each delay a different delay time from the following list: 1/2 second, 1 second, 2 seconds, 5 seconds, 10 seconds.
Next: 2. The number box object