Many of the things we need to do involve numbers, but even more will use text within Max: words used as commands, words used to set parameters and words used for user display purposes. Having an object that can use text as well as numbers is important working with Max, and is accomplished using the message box.
The message box object
The box is another user interface object, but it is also the most versatile object in the Max palette. This single object can perform all of the following functions:
- Generate messages when clicked (similar to a pushbutton).
- Generate messages when a message is received.
- Store and create mixed mode (text, number and list) data.
- Display incoming messages.
- Create commands that alter other objects.
Let’s start by creating a simple patch to see how this works. The message box is the second object in the palette, and is displayed as an unbordered object box. When you select it from the palette, you are given an editing cursor to fill in its contents. Create a new message box and enter the word “test” in it. Connect the message box to a print object, creating a patch that looks like this:
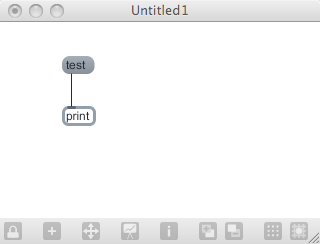
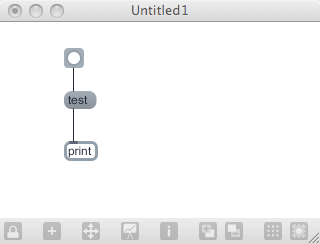
Now lock your patcher window and click on the message box. You will see (in the Max Window) that the contents of the message box — the “test” message — is displayed. When used in this way, the message box acts as if it were a button that will output its contents as a message. If you hook up a button to the left input of the message box, you will see that the message box also outputs its contents whenever it receives a bang message.
Now let’s see what happens when a message box receives a message other than a bang message. Connect a number box to a “message received” message box, and connect the message box to a print object. Your patch should look something like this:
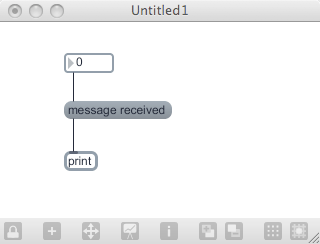
If you click and drag on the number box, it will create numeric messages sent to the message box. However, these numbers do not cause the output of the message box to change — the output is still the “message received” contents of the object. In order to tell the message box to pass through the data that it receives, we need to use a special identifier: the $n value. Message boxes treat the symbol $1 through $9 in a special way — replacing the identifier with incoming data. Modify your patch to include the $1 identifier in the message, making something that looks like this:
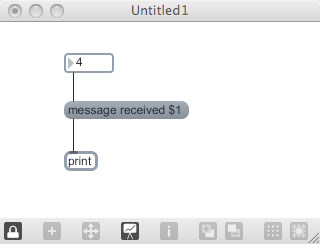
Now, when a new numeric value is received by the message box, it changes the $1 identifier to that values and outputs a new message. If you enter the number 50, the output of the message box will be: “message received 50”.
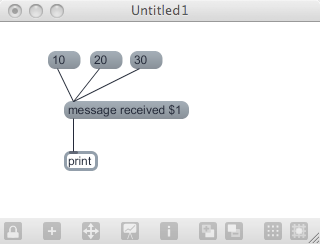
Message boxes can hold any kind of value: numeric or text (called symbols when used in this way). So, if you wanted to create a patch that only allowed three different numeric values, you could create something like this:
Message boxes can also hold a more complex form of data called a list. A list is a combination of symbols and numbers that move together as a single message. A good example might be a set of MIDI data for a keyboard. The note number, velocity and MIDI channel all need to move around your patch in lockstep. Rather than have them running along parallel lines, you can combine them as a list and they will stay together as a single message.
When working with incoming lists, the $n messages become more important. The number used is the number of the list element that is being used. $1 is the first element in the list, $2 is the second and so on. Since you can address the list elements in any order you choose (or even ignore elements if you like), you can reformat any incoming list message within the message box.
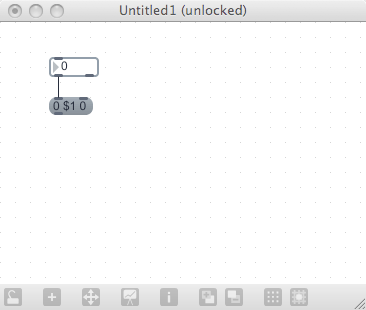
Let’s make a patch that constructs a list and reorders it using only number boxes and message boxes. Start with a number box, and have it move into a message box that constructs a three-number list. Have the second number change to the incoming value, like this:
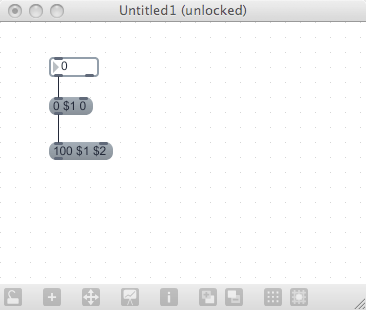
In a second message box, make the first element the number 100, then use the first two elements of the incoming list, like this:
Finally, in a third message box, reverse the order of the three list elements using the $1, $2 and $3 identifiers. Send the results to a print object, creating a patch that should look like this:
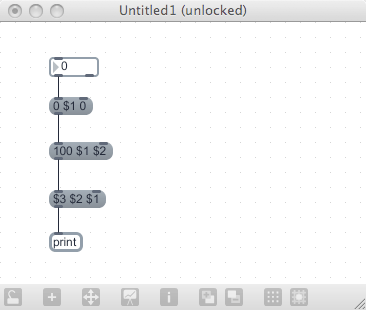
As you change the value of the number box, you should see the Max Window displaying a three element list in the form of “0 nn 100”, where nn is the value that you put into the number box.
Exercises
-
Create a patch that allows the user to select from three choices: 30, 50 and 70. Display the results in the Max Window in the form of : “The user selected nn”, where nn is the selected valued.
-
Create a patch where an incoming number is appended to the list “1 2 3”, then the output is displayed (in the Max window) in the form “nn 3 2 1”, where nn is your incoming number.
Up to this point, whenever we wanted to display a message, we would send it to the Max Window using the print object. However, sometimes this is undesirable — you may want to see the message right in your patcher window. This is what the right inlet of the message box does: it allows you to fill in a message box with the contents of an incoming message. Create the following patch:
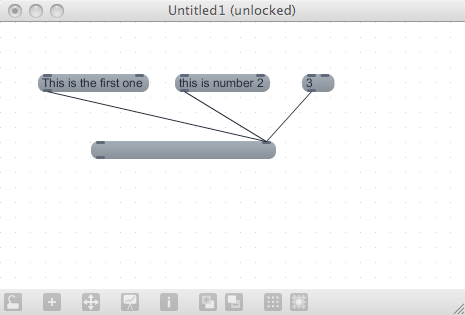
If you lock the patch and click on any of the top message boxes, you will see that the bottom message box will display this message. This is a powerful way to see the messages that are flowing through your patch, and is very useful for debugging when the Max Window might get too stuffed with messages.
Important Note: When you make a connection to the right inlet of a message box, you replace the message — but it doesn’t output anything! This is one place that a lot of people have problems with, and you need to make sure you understand the use of the right inlet!
Friend Objects: append and prepend
We’ve seen how we build up a complex message using the prepend and append commands to the message box, but sometimes it is inappropriate to be changing a message box’s contents: it may contain information that needs to remain stable, and just needs some formatting before it is displayed. Also, we may want to format a variety of messages in exactly the same way. In this case, you can use the append and prepend objects to format your output.
These are two standard objects that take arguments for the data you want appended or prepended. A good example patch looks like this:
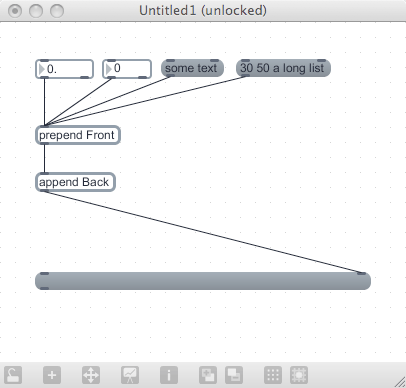
We are sending all of our message boxes into a prepend object that puts the phrase “Front” at the beginning of the list, then sending that message into an append object that puts the phrase “Back” at the end of the list. Notice that this works whether we are sending it lists of symbols, lists of numbers or even a single numeric value.
Exercise
Make a patch that accepts five different inputs of your choice, and puts the phrase “is what I entered” at the end of it. Display the results in a message box (using the right inlet).
Related Object: the comment
Sometimes we want to put textual information into our patch as a reminder of something, or as instructions for someone that wants to run our patch. This is what the comment box is for:
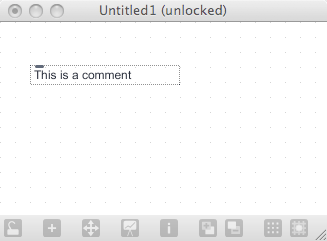
When a patcher window is unlocked, the comment object will have a dotted border around it, showing us where the comment object is located. When the patcher window is unlocked, however, the border disappears, telling the user that it doesn’t respond to user interaction. Commenting a patch is important, especially as things get more and more complex. Generally, it is useful to provide comments that remind you, the programmer, what you were doing in a section of a patch, and to put information about where to start for new users of your patch.
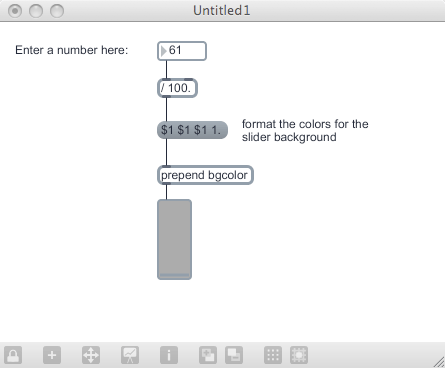
A good example of some simple commenting might be a patch like this:
Theory
One of the most powerful functions of the message box is to create commands that will alter the behavior or appearance of another object. Let’s use a floating point number box and a message box to create the command necessary to change the background color of a regular number box. Create a patch that looks like this:
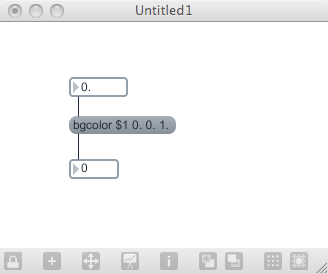
You will notice that we are using a floating point number box (flonum) as input to the message box, which is building up the message “bgcolor nn 0. 0. 1.”. While we’ve not seen this before, the “bgcolor” command to a user interface object will change its background color. The four numbers needed for this color change are Red, Green, Blue and Alpha (transparency) values, all with values between 0. (off) and 1. (on). This is a common format for colors, and is used with all Max user interface objects.
The incoming floating point value is transformed into the Red value of the color set, with Green and Blue preset to 0.0 and the transparency set to 1.0 (fully opaque). When you change the flonum value, you will see that it doesn’t change the value in the number box, it only changes the background color. The message box has transformed the numeric value into a command that the number box can understand and act upon.
Exercise
Create a patch where one flonum will change the background color of three different number boxes: one red, one green and one blue.
We talked about groups of data tied together as lists, and we talked about commands used to change the properties of a connected object. But there is a special case of the text messages that is very important: the use of the “set” message to alter the value of a connected object without data output.
If we connect two number boxes together, any change to the first number box will cause two things to happen: the value of the second number box will change, and the second number box will output that new value:
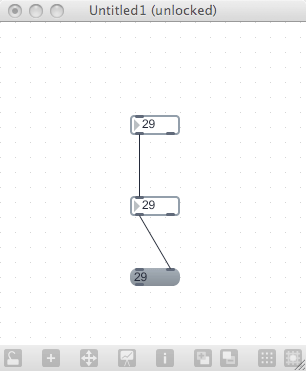
But what if we want to change the value without sending out a message? This is where a set message can help. Change the above patch to look like this:
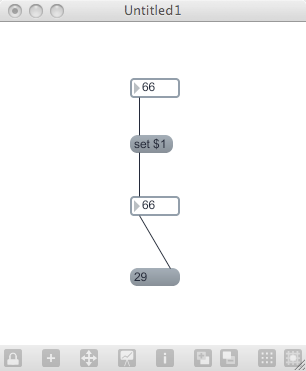
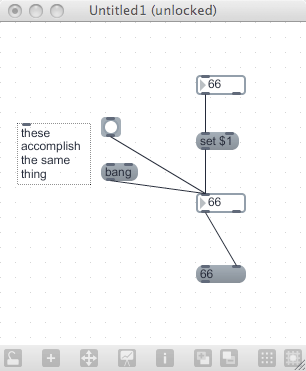
Now, whenever we change the value with the top number box, the bottom box’s value changes, but it doesn’t output the new value. We can see this, because the connected message box doesn’t change. How would we then display the new value? By connecting a button or a bang message to the inlet of the second number box. We can change values all day without outputting the new value; it isn’t until we click on the button or the bang message that the bottom message box is updated.
Next: 4. pack, unpack