To this point, we’ve been focusing on manipulation of the image, and using a simple jit.op to combine images together. In this lesson, we will use look as more sophisticated ways of combining images that will create a better range of effects.
Object: jit.xfade
The first, and probably most important, object for image combining is the jit.xfade object. As its name suggests, it provides a crossfade between two images, with a value of 0.0 showing 100% of the image coming into the left inlet, while 1.0 shows 100% of the image coming into the right.
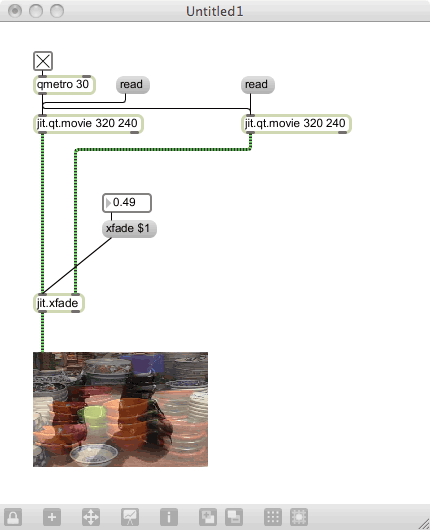
How is this different that using the jit.op combination? The main difference is that using jit.op with a + operator simply adds the two images together. You’ve probably seen that, when images overlap and are rather bright, you can over-saturate the image without much effort. What jit.xfade provides is the ability to decrease the brightness of one image when another begins to fade in, thus preventing (for the most part) image overload.
You could conceivably do this with a combination of jit.op operations, but it would be tedious, and the jit.xfade provides a single value to execute the crossfade, which is a great boon to patch modifiers.
Exercise
Create a two-video patch, then use jit.xfade to fade between them. Add a drunk object that will move between the two videos in a semi-random way. Now add a third video (and therefore a second jit.xfade) to bring in a third video manually. Try using a slider rather than a number box to do the crossfade.
The jit.xfade object provides the most obvious (and classic) way to blend two videos together. But another way to do it is to use the alpha (transparency) channel to help make the change. But in order to do this, we will need to understand how to manipulate the color mapping within an image.
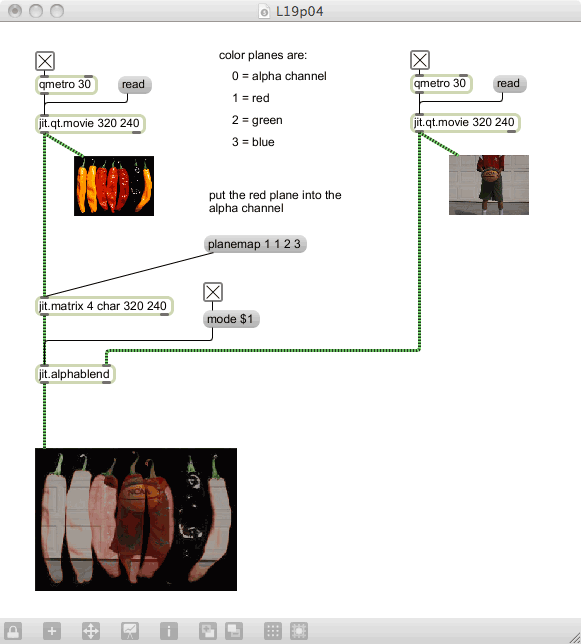
When we have a jit.matrix object that we are using for image manipulation, there is an option available for switching or overlaying the color planes. Create the following patch, and load in the chilis.jpg image:
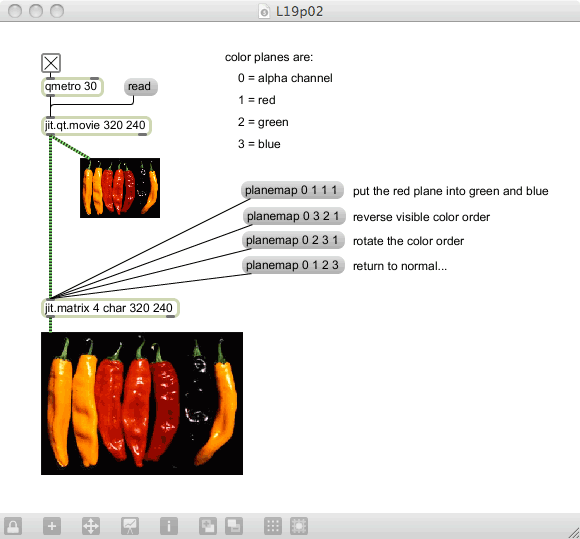
We are using a new message — the “planemap” message — to switch around the color layers. We can swap the red, green and blue planes independently, or even replace all of the planes with the contents of one. This is important, since one of the available planes is the alpha plane. To easily load in the contents of one of the color planes into the alpha channel, all we have to do is replace the alpha plane with the contents of another plane:
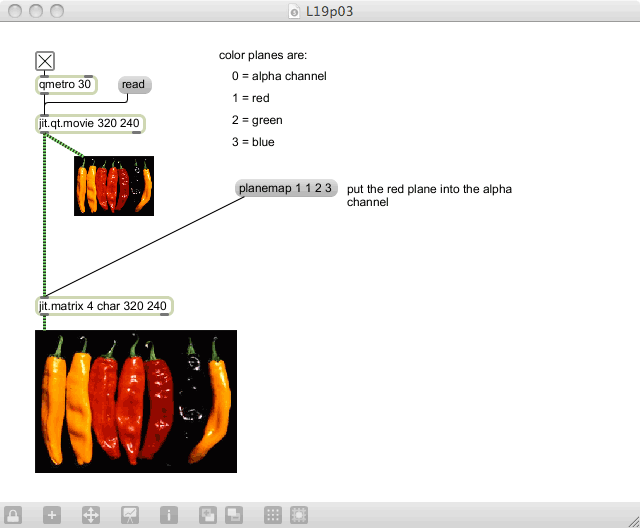
Now we have a transparency that we can use to allow another image to “peek through”. There are various ways of combining images that have alpha plane settings, but we will use a new object called jit.alphablend to do this work for us:
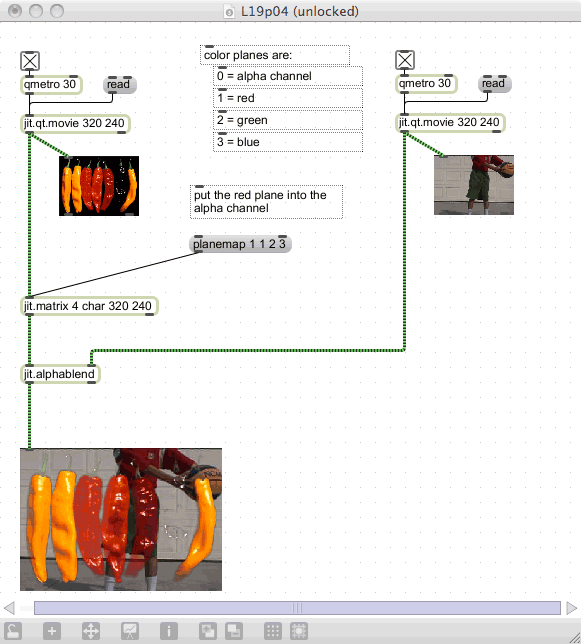
Using the left inlet’s visual to provide an alpha plane, this object combines a second image, allowing it to jump through anyplace (and at any level) provided by the alpha channel. This gives us the ability to make see-through images and matte-based image layering.
Another option is to use the mode message to invert the alpha channel conversion. Using a toggle (which sends 0 or 1), we can change the mode to reverse the alpha conversion, giving us a completely different view of the underlying visuals.
Exercise
Create a patch that uses color plane swapping to create a psychedelic (and rapid) alpha replacement and alpha blend; use source material with vivid colors to make the impact most significant.
Related Object: jit.chromakey
One of the more exciting functions to work with is chromakeying — the replacement of one color in an image with another image. We most often think of the local weatherperson when we thing of chromakeying; it’s the video function that allows the individual to stand in front of a computer-generated map as if they were in front of a physical map.
Rather than creating a new patch for this, we will look at the jit.chromakey help file. It is a fairly simple patch (and easily co-opted for your use), but it contains a few valuable features, and it shows us some extras about mode usage.

If you load a video into the left-hand video player, you will see the image displayed in two places: in the small display at the top, and the large display at the bottom. The instructions near the top display state that you can click on the image to select a key color. If you do this, you will replace that color in the image with black (since we don’t have another video loaded into the right-hand player).
Now load a second video into the right-hand jit.qt.movie object and start its playback. You will see that the second video is “pushed” through everywhere that contains the color that you selected. Try moving around the color palette to see how different colors are picked up in the image.
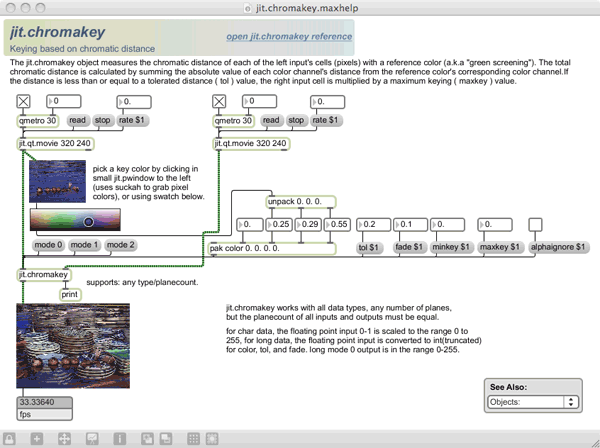
Unlock the help patch to see what is happening. You will notice that the top window has a red figure over it — this is actually an overlay object called “suckah”. When you click on a suckah object, it will return the color corresponding to the pixel underneath the object — in this case, a jit.pwindow object playing the video. This is sent to a swatch object for you to see the selected color, or to select a new color. This is then fed to the jit.chromakey object through the pak object on the right.
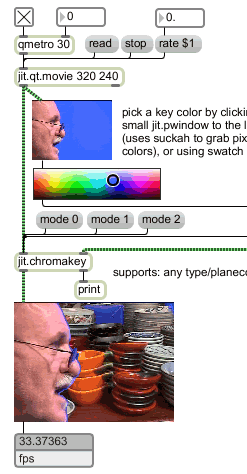
Now, lock the help patch and get a nice keying image: a good file to use is the “oh.mov” video that comes with Max. This is custom-made for chromakey work, since there is a solid blue background to the image. Select that color, and watch the action…
Now, click on the “mode 1” message above the big display. You will notice that the image turns black-on-white; this is a special matrix output where the image is showing you the masking that is being used for the chromakey work. This is useful if you want to do color-detection without necessarily performing a chromakey job, or if you want to use this matrix for further manipulation.
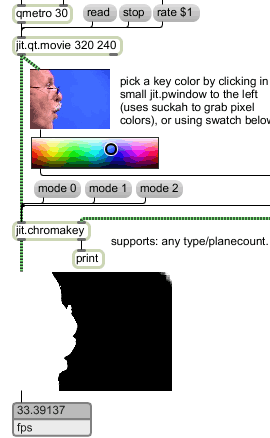
Now click on the “mode 2” message. It may look as if nothing has happened, but in actuality there has been a change: the key mask (seen in mode 1) has now been applied to the alpha channel of the movie. If we were to use the mode 2 output in a alpha-aware patch (like our jit.alphablend above), we would see that the alpha channel now has content that we can use for mixing.
Exercise
Modify your alphablend patch to accept the output of a jit.chromakey object in “mode 2”. Prove that the alpha channel is properly set up for blending.
In this lesson, we’ve learned a lot about mixing videos together. This also represents the end of our video-related lessons; the next (and final) lesson will provide a quick look at OpenGL and GL rendering using Jitter.
Next: 20. jit.gl.render