It’s time to start looking at audio processing. This is going to be a long lesson, since we will have to introduce a load of friend objects in order to make our first sound. Don’t worry, though — it all comes together in pretty quick fashion, and many of the concepts will be similar to the things you’ve learned about Max.
The cycle~ object
The cycle~ object is the first object that we will use from the MSP portion of Max/MSP/Jitter. MSP (short for Max Signal Processing) is the part of Max that is used to produce realtime audio output. Most of the MSP objects end with a tilde (~) to help you notice them within a patch.
You instantiate a cycle~ object just like any other Max object: you create a new object box and type cycle~ into it. Max will see this object name and understand that it is an audio object rather than a standard Max object. The cycle~ object uses an options argument that we are going to start with; this argument determines the default frequency of the audio output. We’ll use 440.0 as a default frequency:
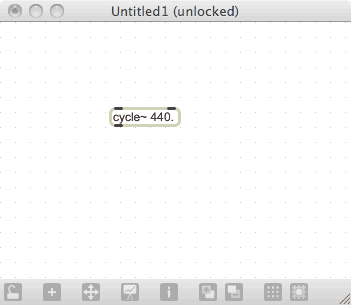
You want to make sure to use the tilde at the end of the object name; cycle and cycle~ are two different objects, and dropping the tilde will not give you what you expected.
An audio object with no connection to your computer’s audio interface is truly a tree falling in the woods. In order to hear what we are doing, we will immediately introduce a second object: the ezdac~ object.
Friend Object: ezdac~
The ezdac~ object is a user-interface object, so you will find it on the palette. It is the item that looks like a small speaker. Place an ezdac~ on your patch.
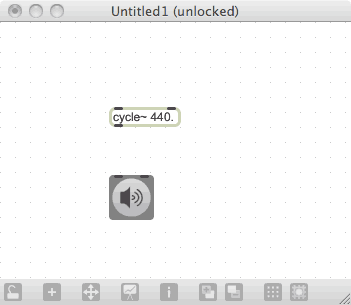
The ezdac~ object serves two purposes: it allows you to connect audio objects to your computer’s audio interface, and it allows you to turn MSP processing on and off. Lock the patch and click on the ezdac~ object. You will see that it clicks on and off (and you may hear your computer’s interface click as well).
Now, in order to make the cycle~ object play through our computer, we need to connect it to the ezdac~ object. You do this by connecting the left output of the cycle~ object to the two ezdac~ inputs.
Caution
CAUTION! TURN DOWN YOUR COMPUTER AUDIO LEVEL BEFORE MAKING THIS PATCH! IF YOU ARE USING HEADPHONES, TAKE THEM OFF!
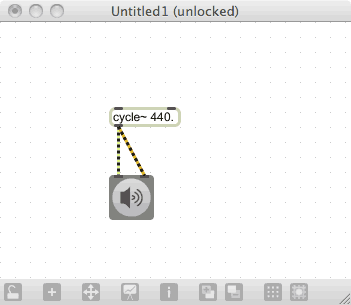
If you lock the patch and turn on the audio input, you should be able to hear the result of the cycle~ object as a sinewave tone at A/440. One thing you will notice is that the cables connecting the cycle~ to the ezdac~ are different from normal cables — they are yellow and fuzzy. This is a visual indicator to you that the information flowing down this cable is an audio stream and not your normal Max messages. You cannot connect the audio outputs of an object to a standard Max object; the audio information is not understood by Max object at all.
At this point, we’ve created the simplest audio patch possible: an audio generator and a hardware interface. Given the warning above, you can guess what’s next: a way to adjust the volume.
The gain~ object
The easiest object to use for volume control is the gain~ object — another user-interface element. This object is on the palette, and it looks like a slider with some diagonal stripes on it. Put one of these on your patch, then connect the output of the cycle~ to the input of the gain~, and the output of the gain~ to the input of the ezdac~:
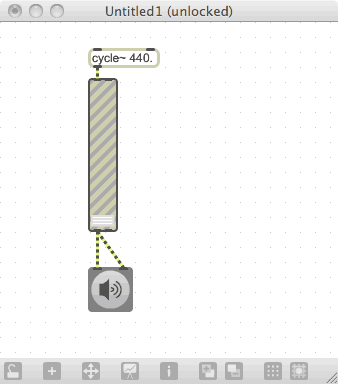
Now, if you lock the patch and turn on the ezdac~, you shouldn’t hear much because the gain~ is turned completely off. Slowly increase the gain~ slider and you will hear the volume increase. This is the essence of audio level control all stashed in a single object.
Next, we need to be able to change the pitch of the cycle~ object. The input of a cycle~ object accepts either an audio signal (for constantly changing values) or a floating point number (for a static value). We will use a flonum number box to set the pitch:
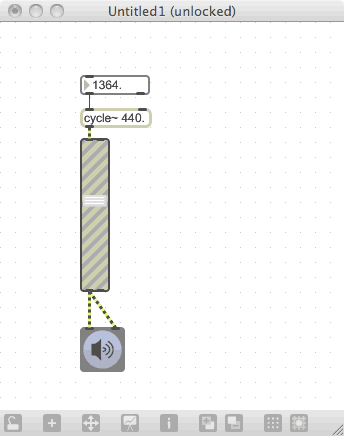
Lock the patch, turn up the volume and adjust the number box — you should hear the pitch changing. If you don’t, double-check all of your patchcord connections.
One of the things you will notice is that all of the sounds are mono: the left and right sides of the audio are the same. We are going to make a patch that has separate pitches in each of the stereo channels. To do this, we will just duplicate everything except the ezdac~ and place it next to the originals (using copy/paste, or by selecting everything and option-dragging a copy). Then we change the connection for the first gain~ to connect to the left side of the patch and connect the new gain~ to the right side.
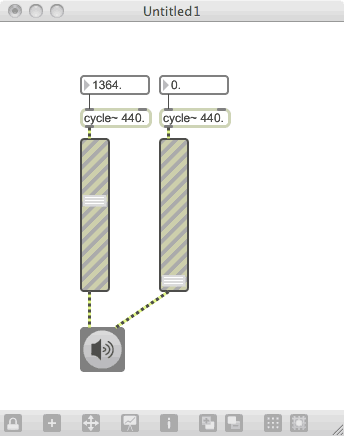
Now, when you bring up the volumes, you will hear two tones — one in each side of the stereo field. If you change one of the pitch values or change the volume, you can hear it change on one side or the other.
What if we want both tones in each of the stereo channels? To do this, we have to mix the signals. Interestingly, there is no object that does mixing — instead, you just connect more than one audio patch cord to an inlet. Max/MSP knows enough to combine the two signals before they are used.
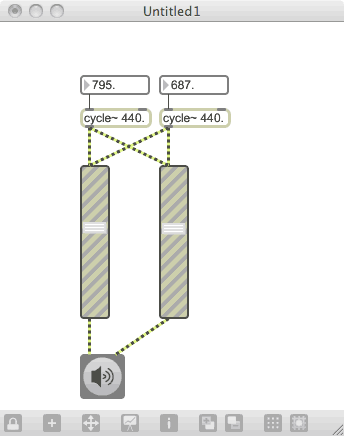
This mixing process combines the two signals without changing the volumes. If you want to do a typical mixing job of both volume control and signal combination, you will need to do the volume control yourself. This is easy to do by placing the gain~ control before the signal combine in your patch:
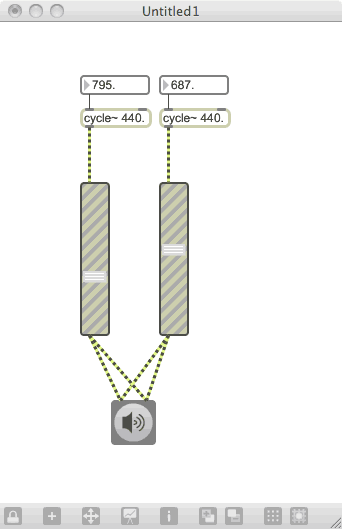
You can control the gain~ setting with a normal number box. The range for a gain~ slider, by default, is from 0 to 157, where 127 represents full volume and values higher than that represent amplification. You can change this using the object inspector, but we will just go with that default, limiting our levels to the 0-127 range. Add a number box to the patch and connect the outlets to the inputs of the two gain~ objects. Now, with one control, you can set up the volumes of both gain~ controls.
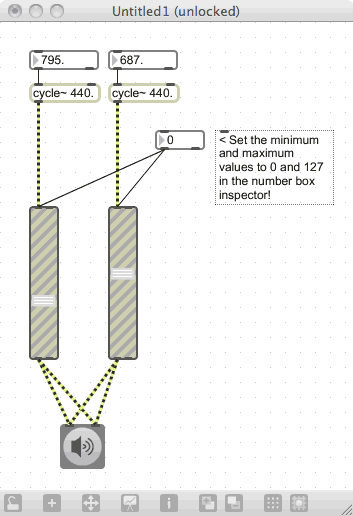
What if we want to use the number box to control panning instead? We can just change our logic; rather than using the number box to control the volumes, we’ll change it to move the slider in contrary directions. To do this, we will have to use one of the lesser known (but very important) math objects: the reverse minus.
The reverse minus, or rminus, reverses the order of a subtraction. Rather than subtracting the object argument from the input, we subtract the input from the argument. Let’s see this at work:
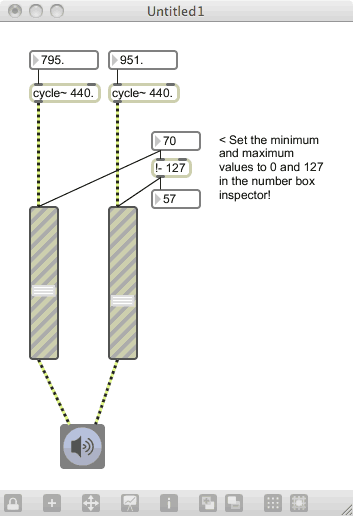
Now, you can see that our number box controls one gain~ object’s value, while the other is moved in the opposite direction based on the output of the rminus object. This is a simple way of working with converse movement, but it is a function that you will use often when working with mixing controls.
Exercise
Using some of the randomization techniques from earlier lessons, create a patch that generates sound from four cycle~ objects, mixes them together at random volumes, and places them randomly in the stereo field. You will be doing a lot of duplication, so make sure you take advantage of the copy/paste function to do this.
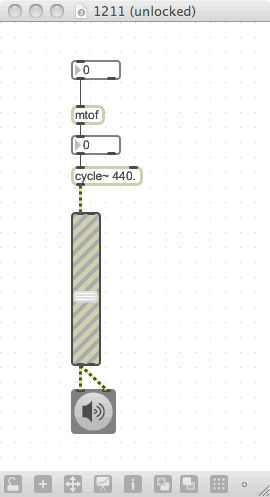
One thing that you will notice is that, since your exercise patch used random selection to create the frequency, that it wasn’t exactly music in a traditional sense. If you want to have your random function produce only standard pitches, it is easier to randomly create MIDI notes, then translate them into a frequency before you send them to the cycle~ object.
Friend object: mtof
The object that does this is the mtof object. It takes an integer value from 0-127 (the MIDI note range) and translates it into a frequency that can be used to properly drive a cycle~. Here’s a simple example of mtof in use.
Exercise
Change your previous exercise patch to only produce standard MIDI note output. All of the rest of the patch can stay the same.
Theory
Doing panning in the way we presented above has some problems — the main one being that it takes over control of the volume levels, and forces you to have more gain~ objects than necessary. It also doesn’t perform the “equal-power†function that is typical for audio panning, which is not strictly linear in function.
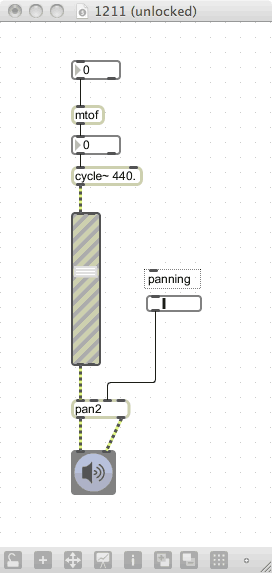
Max comes with an abstraction, found in the examples folder, that can solve this for us. It is called “pan2â€, and it creates an equal-power pan of one signal into two outputs. There are two scaling inputs: one in the range of 0-127 (with 64 meaning a pan to center), and another in the range of -1.0-1.0 (with 0.5 representing center). Why two ranges?
The -1.0-1.0 option is convenient if we are calculating a range from some other value range, while 0-127 is a convenient range if we are working with MIDI controllers or something like the default output of a slider. I prefer to use the 0-127 range; this way, if I later decide to hook up the control to a MIDI controller, I don’t have to make any changes to the input range:
Conclusion
At this point, you have the tools to create a sound without using any external hardware or software — everything is built within Max. This gives you massive control of the sound creation function, and is why many performance artists use MSP objects for sound creation.
Next: 13. buffer~