So far, everything that we’ve done has required user action (mouse clicking, dragging or text entry) in order to generate events. But Max is often used to generate event. This tutorial will be all about generated events, with a variety of objects that are made for that purpose.
The metro object
The most popular object for generating events is the metro object. Given an interval, it will create bang messages in a metronomic fashion (and hence its name). Create a patch like this:
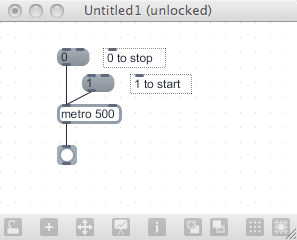
The argument for the metro object is the interval between events — in milliseconds. A millisecond is 1/1000th of a second, so the argument of 500 represents half-second intervals. Click on the “1” message box to start the metro output, and click on the “0” message box to stop it. The metro object uses numbers, rather than symbols (like “stop” and “start”) to turn it on and off, allowing us some flexibility in the objects we can use for the on/off function.
You probably noticed that there is a second inlet to the metro object. As you may have already guessed, this allows us to change the metro’s event interval with a numeric entry (such as a number box). Let’s connect an integer number box to the metro to see how it works:
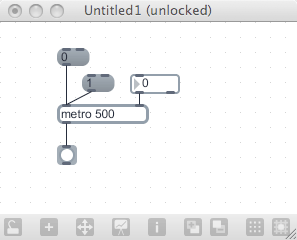
Now you can change the interval by entering a new value into the number box. Very small numbers will create very fast pulses (in some cases, faster than the output button can display them), while very long intervals create very slow output times. If you are used to working with “tempo” for timing, you may find this counter-intuitive. However, it is important to remember that this is “programming”, and programs prefer to work with millisecond timing.
There is one thing to consider when setting the interval for a metro: the point at which a new interval is used. Here’s an experiment: Take our patch and change it to use two different interval times: 500 milliseconds (or ms) and 4000 ms. This will allows us, with a single click, to change between a half-second and four-second interval.
!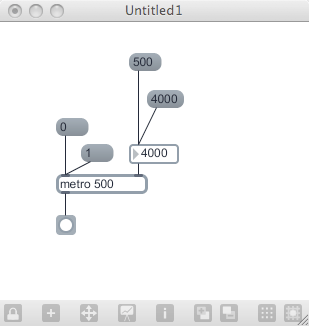
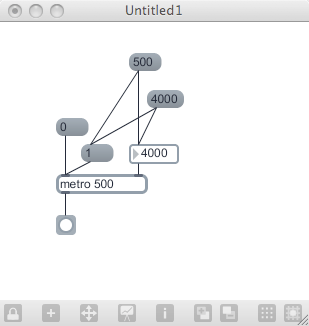
Start the metro (by clicking on the “1” message box) — it starts using the argument’s interval. Now, click on the “4000” message box, which changes the interval to a 4 second clocking pattern. It reacts almost instantly. Now, click on the “500” message box; you will see that the new interval doesn’t get activated until the next 4 second interval is complete. The reason this happens is that the metro is actually “scheduling” the next bang message, and doesn’t schedule a new message until the current one is complete. So if you want to use widely disparate metro intervals and want them to change immediately, you will have to restart the metro any time you change the timing.
Luckily, we already know how to do this. By having an interval change message also force a restart of the metro, we can enforce immediate change to the timing. Here is an example patch that does just that:
Exercise
Create a patch that uses a metro to produce the following phrase:
“The metronome is producing bang messages every NN milliseconds.”, using the current interval setting.
Friend Object: toggle
One object that you will see next to virtually every metro is the toggle object. This is a checkbox-like object, and produces a 1 when turned on, and a 0 when turned off. You can see why this would be useful for metro — that is exactly what the metro needs to turn it on and off. Let’s replace the message boxes from our earlier patch with a toggle object:
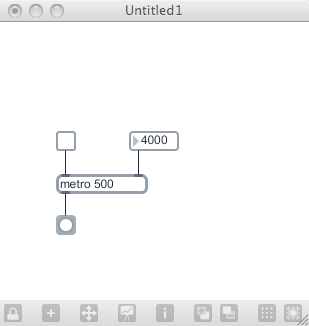
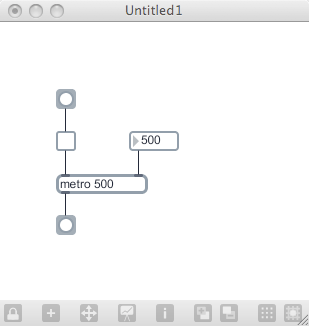
This is a lot more obvious, and makes our patch more user-friendly. The toggle object has another, less-obvious function: when it receives a bang message, it will reverse its current setting. Connect a toggle to the output of the display button, turn on the metro, and watch the toggle change its state:
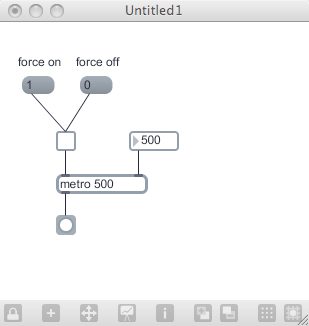
Finally, since the toggle is really a numeric (0 and 1) object, we can send it a number to specifically set its state. If we connect a few message boxes to the inlet of the toggle, we can force it to a specific state on demand:
Exercise
Create a patch with several metro objects. Have each metro start with a different interval, but connect them together so that they turn each other on and off based on their bang outputs affecting toggle objects. You may also want to intersperse some delay objects throughout the patch to alter the timing.
Friend Object: counter
Another object that you will often find near a metro object is the counter object. As its name implies, it counts things — bang messages, to be precise. Each time the counter object receives a bang message, it will increment its counter and output the new value. Here is a simple example:
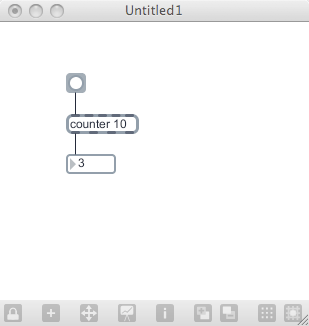
The counter object takes a varying number of arguments, based on what you need to tell is. If you give it a single numeric argument, it will count from 0 to the number you enter:

If you give it two numbers, it will count starting at the first value until it reaches the second value:

Finally, if you give it three values, it will use the first as a “direction” flag, with the following options:
0 = “up”: counts upward from the low value to the high value, then resets.
1 = “down”: counts downward from the high value to the low value, then resets.
2 = “up-down”: counts upward from low to high, then downward from high to low.
Hint: If you want a little pop-up menu to display these options, look in the counter help file…
In addition to using arguments, you can also send messages to the counter object to change its settings, or use some of the inlets to directly control the current counter value. Let’s make a circular light show to show how this works:

The left outlet of the counter object sends the value, which we decode using a select object and display using buttons. The other outputs of the counter are for tracking the “carry” flag — the flag that shows we have hit our maximum. We won’t use this in our examples, but the counter help file can show you how it is used.
Exercise
Create a metro/counter combo that runs between 10 and 20, and prints the phrase “The current counter value is NN.” each time a number is produced. Hint: Think about using replaceable parameters to do this.
Conclusion
The combination of metro, toggle and counter provide many of the tools we need to have Max generate events for complex Max patching. If you start investigating other people’s patches, you will see these few objects at the heart of the most interesting programs. We will be using these objects constantly throughout the rest of the lessons, so make sure that you know them cold! Also, remember to dig into the help patches so that you understand the nuances of the arguments, inlet and outlet use, and potential output messages.
Next: 6. random