Our final audio-focused lesson is going to be on smoothing transitions and envelopes. Our ears are very sensitive to rapid changes in audio content, so it is important to properly smooth changes (assuming that you want a smooth transition). This leads us directly into the…
The line~ object
The line object gives us linear transitions between one number to another over a defined period of time. Let’s start with a very simple audio patch:
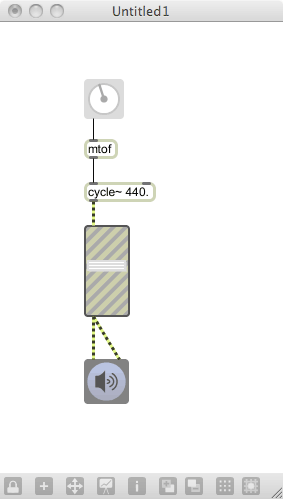
Whenever we change the frequency value, the pitch jumps directly to our setting. However, this isn’t always the musical result we want; sometimes we want a smooth transition from one frequency to another. In order to smooth this transition, we would insert a line~ object into the mix.
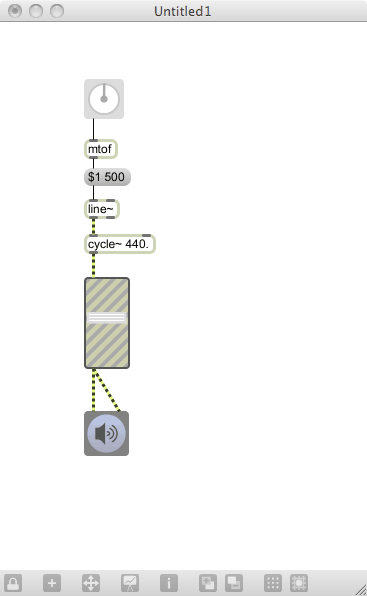
Now, we can hear that the frequency slowly morphs from our current setting to the new setting. The value that we use for an argument is the “starting point” for our transition. The message box that is creating a list provides us with two pieces of information: the next pitch (which is the $1 replaceable value) and the amount of time to make the transition (in milliseconds).
It would be handy if we could see the output of the line~ object, but it outputs an audio-rate value, so we need to use something other than a number box. The easiest way to keep an eye on a changing audio value is using the number~ object.
Friend object: number~
The number~ object, available on the object palette, is similar to a number box, but it works in the audio domain.
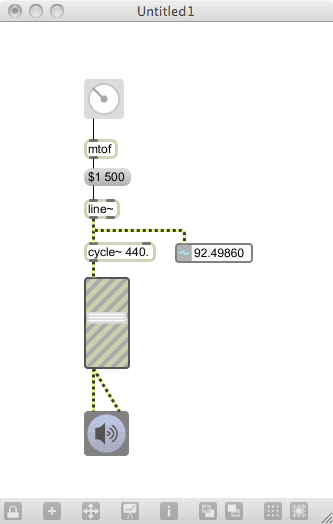
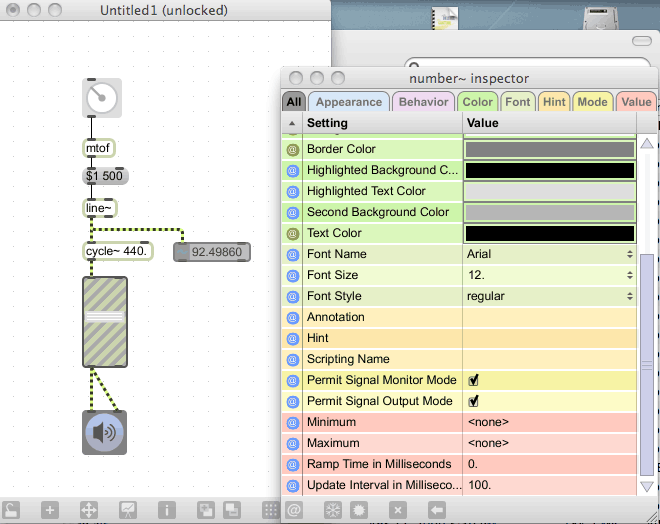
The number~ object samples the audio stream and displays its value at these intervals. You can set the interval in the inspector, allowing you to tune the display to your needs. If the value changes fast (like the output of a high-speed oscillator), you may want to use a fast sampling rate. If it is slower, like in our example, you can use the default rate – or even something slower.
Our example may sound a little odd — the sliding pitch value seems to speed up when we jump to high values, and slow down when we use low values. That’s because the frequency-to-pitch values are non-linear; each pitch step becomes larger as the frequency increases. In order to make things a little more linear, we need to use a new object for our MIDI-to-frequency translation.
Friend object: mtof~
If we do the line~ translation before the MIDI translation, we can make the transitions more linear. However, the output of line is, again, audio-rate, so we need to find a different way to perform our mtof translation. There is an audio-rate version of mtof called mtof~, which we can use to provide our audio-rate translation:
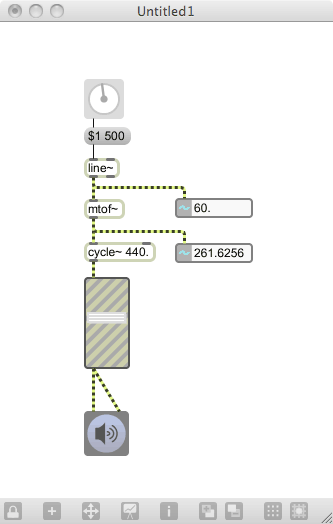
So now we’ve used the line~ transition mechanism to create smooth transitions, but we can also use the line object to create an envelope. Creating envelopes is critically important in almost any sort of synthesis; it is used for amplitude changes that form the basis of many sounds, and is also often used for generating filter changes as well.
The simplest envelope is the AR (Attack-Release) envelope, where two values are provided: an attack time and a release time. The easiest way to create an AR envelope is with the following patch:
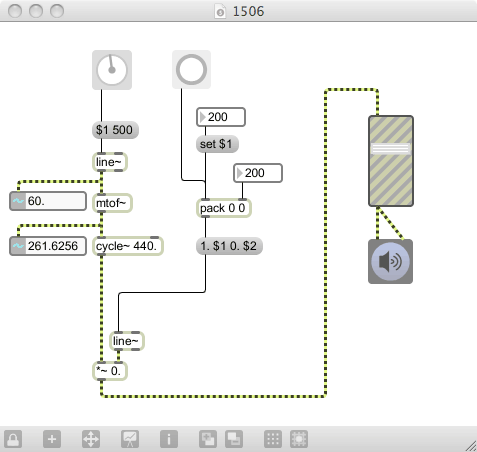
Whenever a note start is received by our device, it will ramp up to a 1.0 level over the time period that was entered by the attack control. The release time is the time it takes to revert back to 0.0 once a note-off is received. Remember: a note off is simply a note message with velocity of 0, so we have to be looking for this on every note message.
A more complex envelope is available with a more complex object: the adsr~ object.
Related object: adsr~
The adsr~ object gives us a complex four-stage envelope; one that produces Attack, Decay, Sustain and Release stages. The controls necessary to create this are:
- Attack time (the time to go from 0.0 to 1.0 at note onset)
- Decay time (the time to go from 1.0 to the sustain level)
- Sustain level (the output level while you are holding a note)
- Release time (the time to go from the sustain level to 0.0 when the note is released)
These four controls are best mapped to MIDI type controls in the range of 0-127, since you will often want to control them with MIDI controllers. In the following synth voice, we will have each timing stage last for 2 seconds, giving us a fairly useful level envelope:
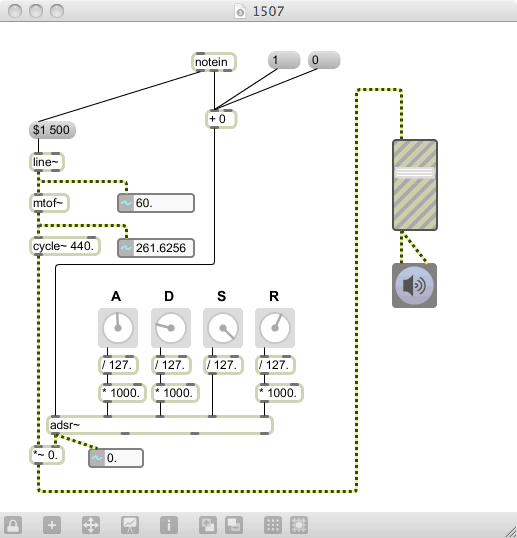
Now, if we combine the adsr~ envelope for amplitude while also using an AR envelope (based on line~) for the filter, we can create a pretty credible analog synthesizer emulation for our synth voice:
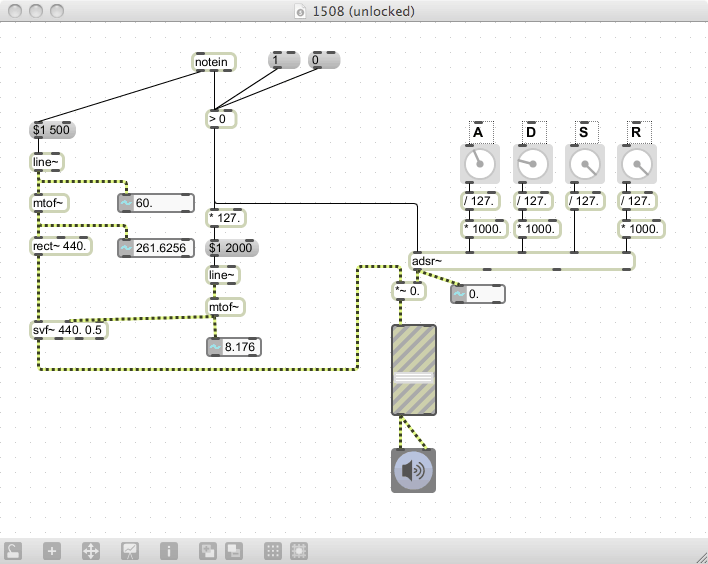
You can use a combination of the line~ and adsr~ objects to create a vast array of sound modifiers with relative ease. One of the best things about the MSP objects is that we can plug almost anything into almost anything else and it all comes together with relative ease!
Next: 16. jit.movie