Visual Effects
The Jitter portion of the Max package provides a remarkable number of visual effects that can be applied to your video content. What is convenient about them is that most of them work similarly to the plug-in systems that most people are familiar with based on experience with video and audio editing programs. Each of the objects we will work with today perform a number of related functions, so just a few objects can provide an amazing amount of video fun.
Object: jit.brcosa
The first object we will work with is jit.brcosa. The “brcosa” part is short for BRightness, COntrast and SAturation. These are common video manipulation techniques, and we’ll use them to automate some interesting changes to our video. Create the following patch to see how it works:
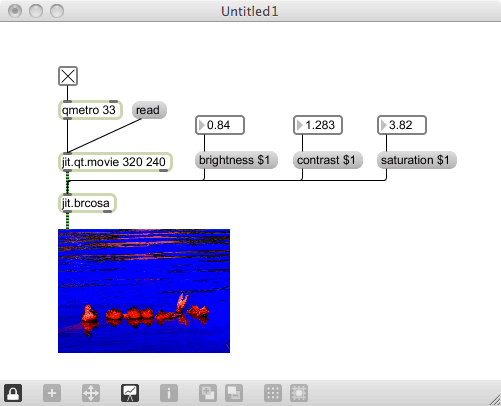
The jit.brcosa object just plugs between some video output and the display window that is showing the video. It then gives us a way to control the three functions — brightness, contrast and saturation — that is the purpose of this object. The floating point values that we will use need to be clamped to stay 0.0 or above, but otherwise you can go a little crazy with the result.
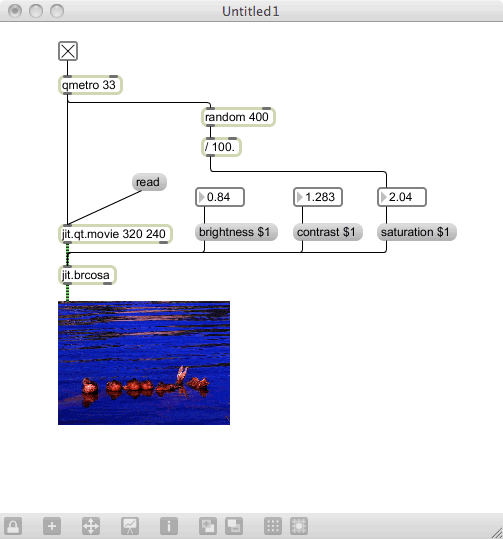
What makes this even more fun is if we use some of our Max knowledge to generate the changes for us. This is a great opportunity to use something like random to generate jarring flashes of effects, and using scale to format the values to something that will be useful within jit.brcosa. Here’s a very simple version where we change the saturation based on a random number:
Exercise
Expand on the above patch by using a counter object to change the brightness over time, and the drunk object to change the contrast over time. Make sure the values don’t go under 0.0 (which can be a problem for some of these effects objects).
jit.brcosa is one of the most straight-forward Jitter objects to use, but there are others that provide interesting result (although are a little more difficult). The first that we will look at is the jit.rota object
Related Object: jit.rota
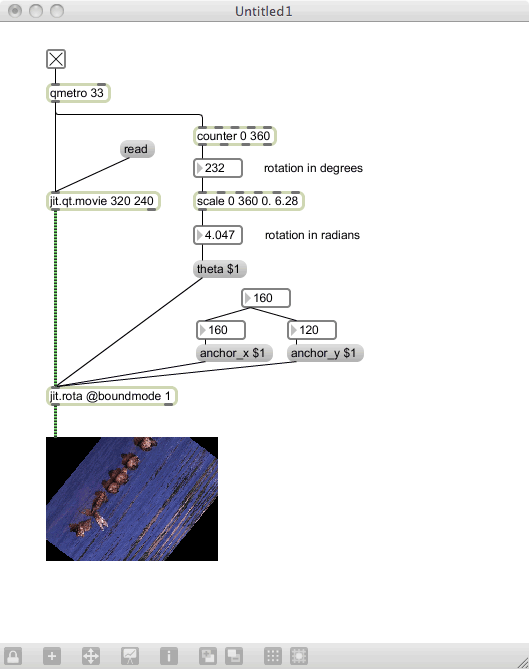
The jit.rota object’s main purpose is to rotate the image. Try this patch to see how it works:
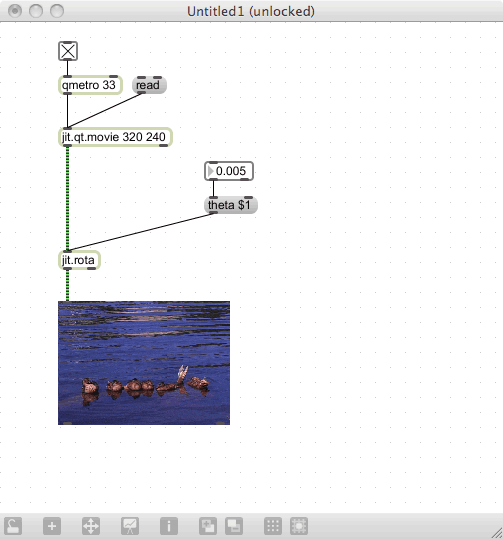
It’s cool, because it allows us to do a basic rotation. But that floating point number, and the message “theta” — what does it mean? Theta represents a rotational value in “radians”, a geometrical measurement that is obviously a lot different than what we think of as degrees of rotation. It would be a lot more convenient if we could just put in a value in degrees and let Max figure things out.
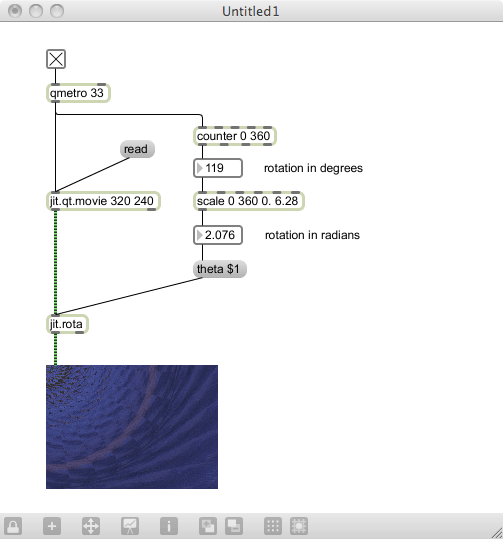
By experimentation, you should be able to see that a value of about 6.28 gives us a complete rotation. That number may not be familiar; it represents 2*pi, and is the value in radians of a 360 degree rotation. If we set up a scale object to translate the number range of 0-359 to 0.0-6.28, we should be close enough to get a decent rotation:

If you want to be precise, the jit.rota has an “expr” (mathematical expression) that does a better job, but our scale should work just fine. Now, we can set up a counter object to auto-rotate for us with little effort.
Another nice thing to do is to change the anchor point that the rotation uses. By default, the anchor point is the top-left of the image, but we can change this using the anchor_x and anchor_y messages. The range is in pixels, so we can now rotate based on off-center (or even off-image) points with these two messages.

You’ll notice that when you do the rotation, the image leaves “droppings” around the edge of the image. This is based on something called the boundmode. If you want a cleaner image trail, you can set the boundmode to 1, and it will clear the image after the rotation is complete. You could set this with a message (as the help file does), or you can just set it as an attribute to the object.
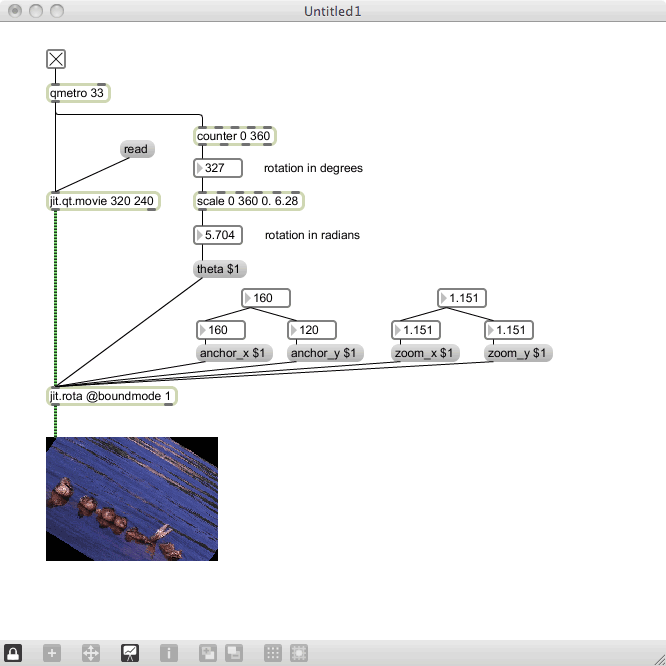
Finally, the jit.rota object has a bonus feature — the ability to zoom and pan the image. The zooming is similar to changing the srcdim values that we saw in the last lesson, but is a little more interactive (and a little less controllable). You use the zoom_x and zoom_y messages to change the zoom factor, and the offset_x and offset_y messages to change the panning. Try them in the following patch:
Exercise
Create a super-automation patch that changes brightness, contrast, saturation, zooming, panning and rotation (with changes in rotation and offset) to make an interesting display from a single movie.
Now, duplicate this patch and use the jit.op object (from the previous lesson) to create a mix of two images each doing the same thing.
Object: jit.wake
One of my favorite things in the world is feedback of any sort. It always seems to take simple material and make it really, really interesting. To add feedback to our patches, we use an object called jit.wake.
jit.wake gives us the ability to have feedback, feedforward (whatever that might be) and to alter the gain of the resultant image. We are going to use the first and last of these options to add some interest to a rotating image.
Using one of the previous patches as a starting point, let’s add jit.wake to give it a little video feedback.
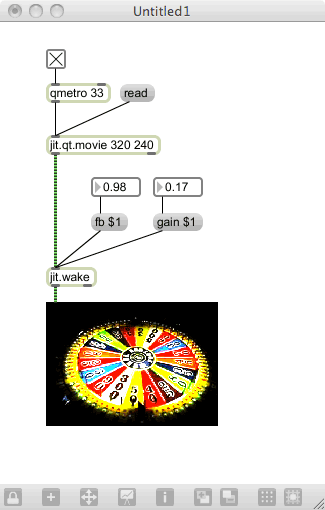
As you turn up the feedback (the fb message) so it approaches 1.0, you will see some extreme feedback — and eventually the image will wash out completely. To pull back on this a little, you can reduce the gain until things are a little more controlled. If you want a really interesting view, drop the gain below zero — you will get an x-ray effect that is pretty in interesting.
jit.wake has a few more options that you can find in the help file. They may not be intuitive, but you can get an incredible amount of use from the jit.wake object. This is true with all of the objects that we’ve reviewed. If you want to see more of the available Jitter options, you can check out the Jitter overview, found in the /examples/jitter-example/jitter_overview.maxpat file in the Max system.
Next: 19. jit.xfade