One of the most common sound manipulation tools is a filter. There are several filters available within Max/MSP, but we are going to start of working with one of the more versatile:
The svf~ object
The svf~ filter provides an emulation of a “state-variable” filter, which provides simultaneous access to several filter types at once. If you aren’t familiar with filters, you should know that they are roughly the equivalent of an “EQ” on a typical stereo or guitar amp, but we have some more control that just the level. Filters generally provide more precise control than a simple tone control might — at the very least, you get a frequency and resonance control.
The filter frequency is the point at which the filter begins taking effect, while the resonance control (sometimes called the “Q” control) determines the steepness of the frequency response — a steepness that includes a “bump” in the frequency response.
You might be surprised that there isn’t a level control for this function. Why? Because a state-variable filter just does what it does — through infinity. It’s easiest to hear this in action, but we need an audio generator that will provide full-frequency sound for us to use in our exploration. So, we need to introduction a friend object:
Friend objects: noise~ and pink~
There are two objects that produce usable noise for our patching: noise~ and pink~. The noise~ object produces full-spectrum noise, while pink~ produces noise that is tailored to our hearing curve (so-called “pink noise”). For our purposes, we are going to primarily use the pink noise option, but we should build a patch with both so that you can hear the difference.
In order to hear both of the noises at the same time, we need to set up a stereo arrangement with each side of the noise working on one of the stereo channels. Build the following patch to hear them in action:

We have one set of controls working on both filters, and each side is feeding to its own channel of the ezdac~. We are also using the first output of the svf~ object, which gives us a lowpass filter. Adjust the frequency setting to hear the changes in the noise that the filter provides.
Now, change the patch slightly to use the second outlet of the svf~ object, which provides us with a high-pass filter. Again, try adjusting the frequency to hear the result:
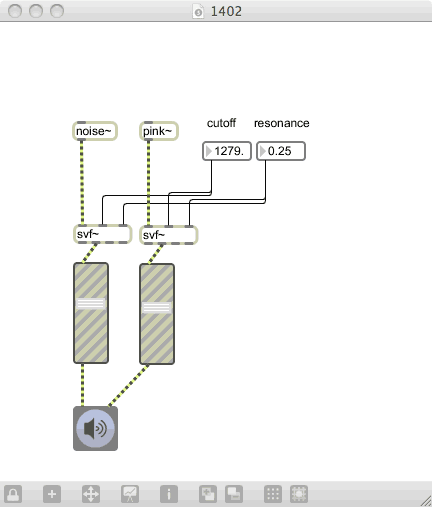
Notice how the lowpass reduces the high frequencies, while the highpass reduces the low frequency. This is the equivalent to your typical EQ control, and closely represents analog filters in action.
The above patches would be a lot more fun if we could use either switches or menus to control which type of noise we were listening to, and which filter output we were using. In order to switch between audio signals, we need to use a new object: the selector~ object.
Friend object: selector~
Create the following patch:
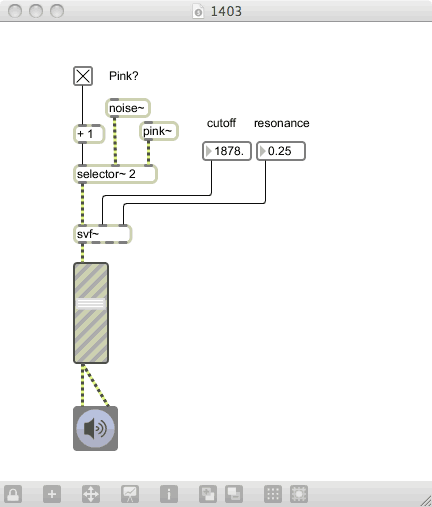
We are using the selector~ object to switch between noise sources feeding into a single filter set. We are using a toggle to select the input, but we have to add a 1 to the output in order to properly select the input. Why? Because, when it receives a “0”, selector~ will select none of the available inputs. “1” selects the first, “2” selects the second — so adding one to our toggle gives us the 1 or 2 value that we need.
Now, let’s use a selector to switch between the four outlets of the svf~ filter.
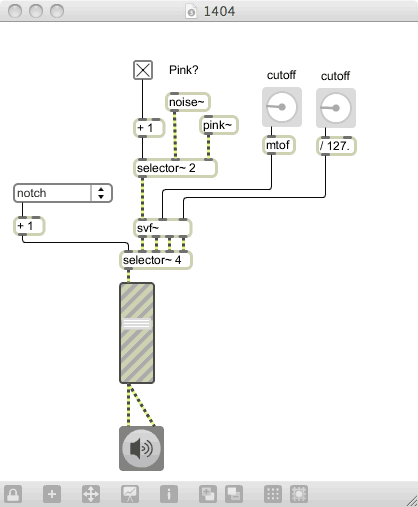
Instead of using a toggle (which only gives us two settings), we are going to use a umenu object to make the selection. You will need to enter the four filter types into the umenu object, which are “lowpass”, “highpass”, “bandpass” and “notch”; these are entered into the umenu inspector. The left output of the umenu gives us the index of the menu selection — we will again add a “1” to that output to give us a useful value.
We also have to instantiate the selector~ with an argument of 4 so that it gives us four inlets instead of the default two. Once we do this, connect up our svf~ filter and route it to our outputs (through a gain~ control), we have a complete noise-and-filter testing patch.
Finally, let’s change the patch to be a little easier to manipulate. We will replace the flonum controls used for frequency control and resonance to use knobs instead. Rather than make knobs that have the whole available range, we are going to use knobs with the standard 0-127 range, then scale them to match our needs:
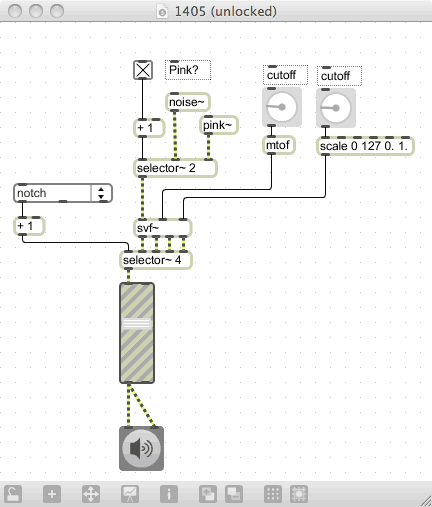
The resonance control uses a standard scale object to change the 0-127 range to a 0.00-1.00 range. The frequency, though, uses mtof. This is a case where the exponential control of the MIDI-to-frequency object works in our favor, and produces a much better result than using a standard scaling function.
The svf~ filter is a great, versatile filter that is useful in most situations. But, sometimes, you need a filter with more control of its function — or perhaps one that provide a more visual interface. In these cases, it’s time to explore the biquad filter and the filtergraph objects.
Related objects: biquad~ and filtergraph~
The most versatile filter in the Max/MSP world is the biquad~ filter. This is a two-pole filter that uses a set of coefficients to determine the filter behavior, and can be used to create almost any filter imaginable. The problem is that calculating the coefficients is an almost unimaginably difficult task, so we need to pair biquad~ with something that will help us out: the filtergraph~ object.
Create the following patch. The filtergraph~ object is available on the palette, typically at the beginning of the second row.
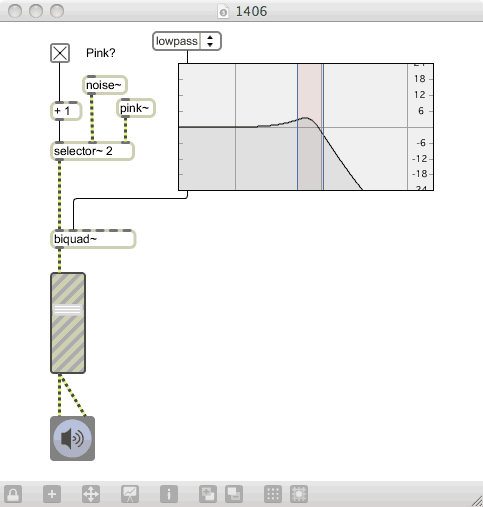
Instead of having to calculate a bunch of coefficients for biquad~, we can depend on the filtergraph~ object to do it for us. This object gives us a graphic display of the filter curve, and allows us to manipulate the cutoff, resonance and gain in a single interface. The only selection that requires another object is selecting the filter type; you can grab the umenu object from the help file in order to accomplish this, or you can enter in the types of filters that you want to support. Note that we use the “textual” outlet of umenu to feed the filter type into filtergraph~: this means that we can put the filter types in any order we see fit.
Now, to use the filter, we select a type, and make our adjustments. When in the highpass, bandpass and lowpass modes, we are given a band of adjustment around the filter cutoff. If you turn on the audio and listen to the result, you will hear the filter adjusting the frequency response of the pink~ object. Try different filter types, play around with effect on the noise, and become comfortable with the variety of ways that you can shape the sound.
Sometimes, you want to use a biquad~ filter in a more traditional way: perhaps by setting it to a lowpass type, and manipulating it with a cutoff and resonance control (similar to the svf~ filter), and not exposing the graph — or having the graphics simply display the results. Luckily, you can do this by using the rightmost three inlets of the filtergraph~ object. These three inlets — cutoff, gain and resonance, respectively, give you a simplified interface to these settings. Create the following patch as an example:
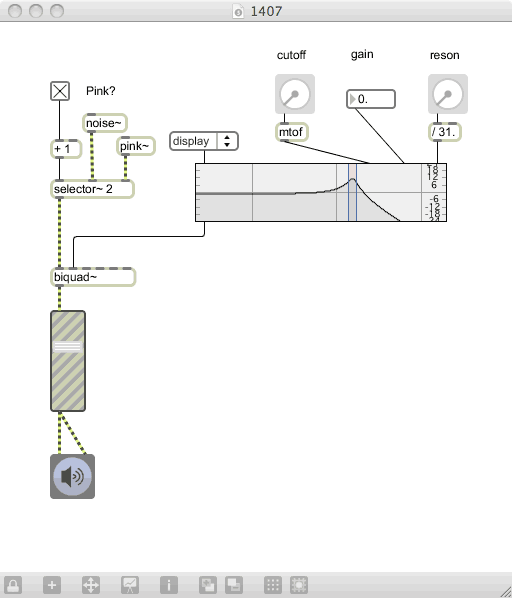
Now we have the ability to set the filter using simple knob controls, but we get a full display of the filter for reference. If you want to prevent users from adjusting the filtergraph~ object directly, you can turn on the “Ignore Click” option in its Inspector, and it will be a display-only item.
What if you don’t want to have a graphic at all? Or what if you want to alter the values using audio-rate signals instead of standard Max messages? Those questions lead us to the next object…
Related object: filtercoeff~
The filtercoeff~ object is, basically, an emulation of the filtergraph~ object’s rightmost three inlets, but they accept audio signals as well as floating point numbers. Create the following example patch:
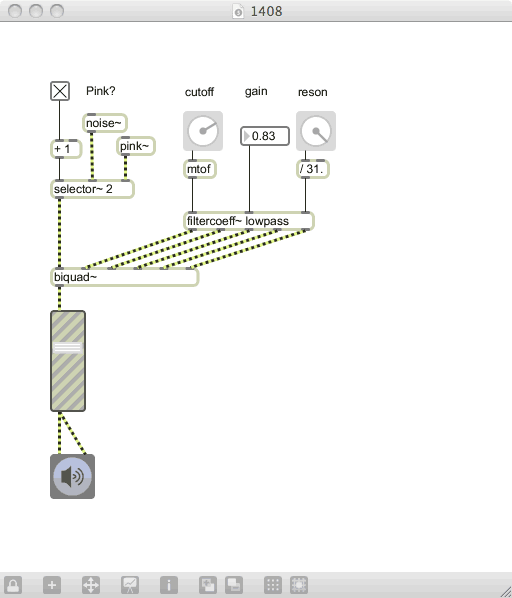
This patch uses a very slow cycle~ object to alter the value of the frequency cutoff, and another very slow cycle~ object to later the value of the resonance. You can set the filter type with an argument (eliminating the need for a filter mode/type umenu, although this is an option), and the outputs feed directly into a biquad~ object. The result is a sweeping noise sound that is perfect for your favorite spacey music.
In the next lesson, we will create a simple synth generation patch, but we will need to play with envelopes and level controls. For now, play with filters and prepare yourself for synth magic!
Next: 15. line~